Latest Entries »

Linux වලට හොද Video/Audio Converter එකක්

ලගදි දවසක මට videos ටිකක් convert කරගන්න අවශ්‍යවෙලා ලිනක්ස් වලට හොද Video converter එකක් හෙවුවා. හැබැයි ඉතින් හොයන්න දෙයක් තිබුනෙ නැහැ අන්තිමට ඒ software එක computer එකේම තියෙනව කියල දැනගත්ත. ඒකෙ නම තමයි ffmpeg. හැබැයි ඉතින් මේක command line tool එකක්. ඉතින් ඒ නිසා video එකක් convert කරන්න යද්දි manually, frame rate එක වගේ දේවල් අපට අතෙන් දෙන්න වෙනව. ඉතින් ඔය එක එක අපභ්‍රන්ස ගැන හරියට මම දන්නෙ නැති නිසා මම තව දුරටත් සොයාගෙන ගියා. හැබැයි ඒ සෙවිල්ල නම් සෑහෙන දිග එකක්. කොහොම හරි අන්තිමේදි මම හොද GUI එකක් සොයා ගත්ත. ඒකෙ නම තමයි Winff. ඉතින් ඔයාලටත් ඔනේ නම් ඒක computer එකේ install කරගන්න.


මේක install කරන්න නම් ඔයාලට කරන්න තියෙන්නෙ පොඩි දෙයයි. මුුලින්ම terminal එක open කර ගන්න. ඊලගට පහලින් දාල තියෙන විදියට type කරල enter කරන්න. (Internet connection එක අවශ්‍යයි.)

ඔයාල පාවිච්චි කරන්නෙ Hanthana හෝ Fedora නම්
su 
type කරල root password එක දෙන්න. ඊලගට
yum install ffmpeg
yum install winff
ඔයාල පාවිච්චි කරන්නෙ Ubuntu නම්
sudo apt-get install ffmpeg
sudo apt-get install winff
මේ winff කියන software අවශ්‍ය නම් Windows වලත් වැඩ කරනව.

References
http://winff.org/html_new/

Configure Conky-Lua in Ubuntu (12.10 & 12.04) or Fedora


conky කියන්නෙ graphical system monitor එකක්. හැබැයි මේක වැඩ කරන්නෙ Unity එකටයි Gnome classic එකටයි විතරයි. ඉහල තියෙන පින්තූරෙ දැක්කම ඒක පේනව ඇති. මේක ඔයාලගෙ ලිනක්ස් machine එකට දාන විදිය මම දැන් කියන්නම්.

මුලින්ම terminal එක open කරගන්න. ඊලගට ඔයලා පාවිච්චි කරන්නෙ Hanthana හරි Fedora නම් හරි පහත command එක terminal එකේ type කරන්න.
yum install conky-all
ඔයාල භාවිතා කරන්නෙ Ubuntu නම්
sudo apt-get install conky-all
ඊලගට conky-loa download කරගන්න.

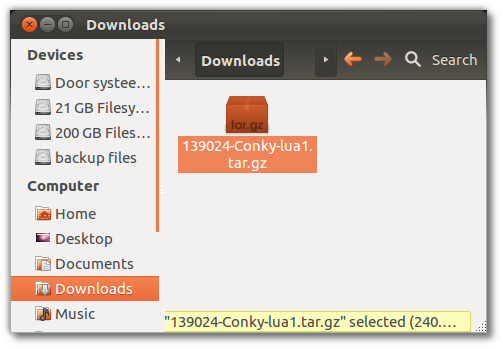
හරි download උනාට පස්සෙ download folder එකට ගිහල්ල mouse එක right click කරල .tar.gz package එක extract කරගන්න.


එහෙම extract කරපු folder එක ඇතුලෙ ඔයාලගෙ OS එකට අදලා tar.gz package එක extract කරගන්න. මගේ තියෙන්නෙ Ubuntu නිසා මම ඒ package එක extract කරගත්ත.


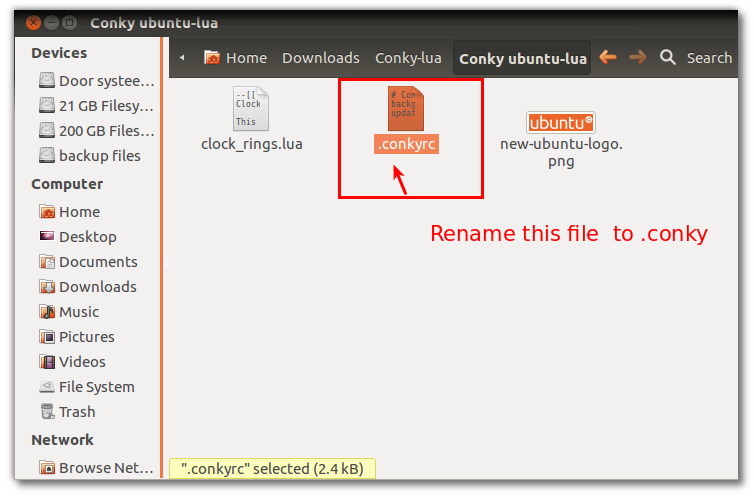
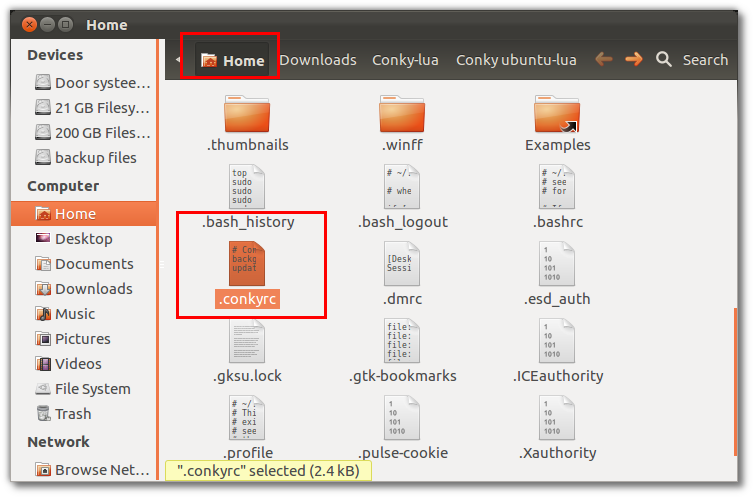
හරි දැන් ඔයා තෝරගනිපු folder එක open කරගෙන (Ubuntu වල නම් conky ubuntu-lua folder එක) ඒකෙ තියෙන conkyrc කියන file එක .conkyrc කියල වෙනස් කරගන්න. ඊලගට ඒ file එක Home folder එකේ paste කරන්න. conkyrc file එක ".conkyrc" කළ එකෙන් කරන්නෙ ඒ file එක අපි hidden file එකක් කළ එකයි (හරියට Windows වල වගේ). ඊලගට Home folder එකට ගිහිල්ල ඒකේ menu bar එකේ View->Show Hidden Items select කරන්න. හරි දැන් ඔයාට Hidden files ටික බලාගන්න පුළුවනි. (හෙන ගොඩක් තියෙනවනේ :) )


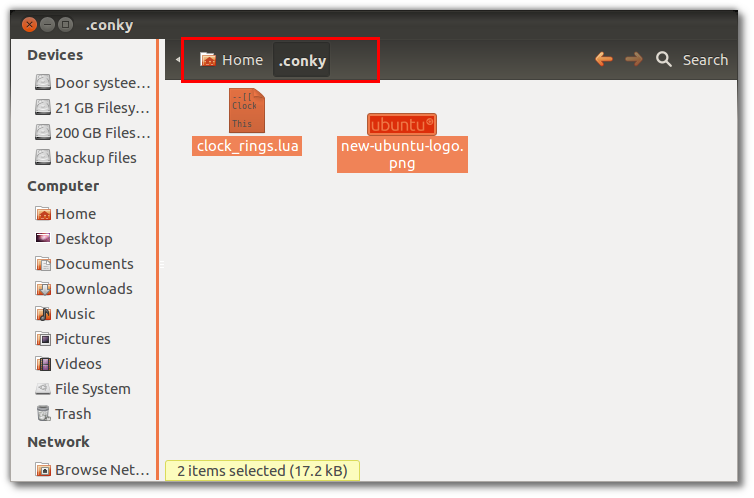
හරි දැන් ඔයා Home folder එක ඇතුලෙ .conky කියල new folder එකක් හදන්න. ඒකට දෙවනියට extract කරපු (conky ubuntu-lua) folder එක ඇතුලෙ තියෙන අනිත් file දෙක copy කරන්න.


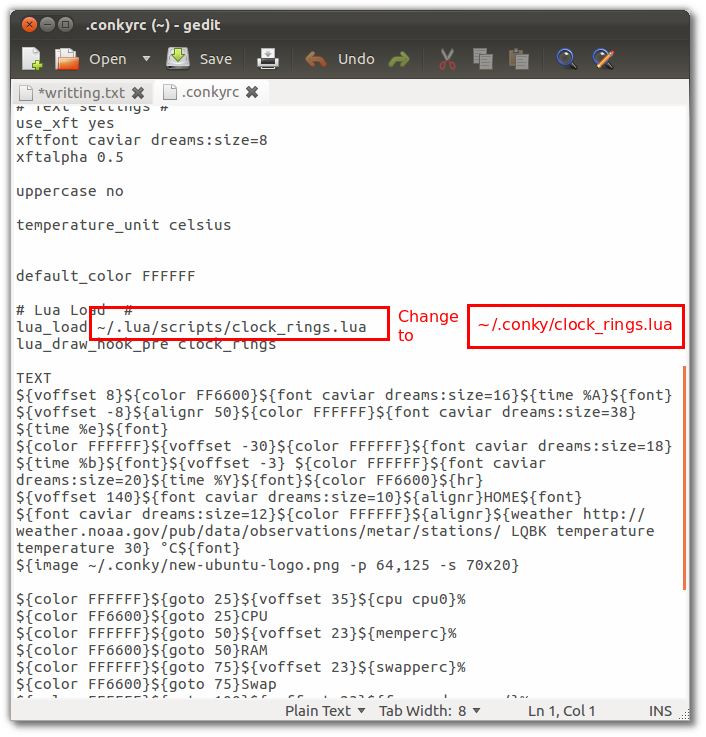
හරි ඊලගට Home folder එකට මුලින්ම copy කරපු .conkyrc file එක gedit හරි මොකක් හරි editor එකකින් open කරගන්න.


ඊලගට කරන්න තියෙන්නෙ ඒකෙ තියෙන
~/.lua/scripts/clock_rings.lua
line එක
~/.conky/clock_rings.lua
 ඊලගට
http://weather.noaa.gov/pub/data/observations/metar/stations/ LQBK
line එක
http://weather.noaa.gov/pub/data/observations/metar/stations/ VCBI
විදියට වෙනස් කරන එක විතරයි. ඊලගට terminal එක open කරගෙන conky කියල type කරන්න. එතකොට ඔයාට අර උඩම තියෙන graphical system monitor එක ලැබේවි.

තාම අපේ වැඩේ සම්පූර්ණ නැහැ. ඒ කියන්නෙ අපි terminal එක close කළාට පස්සෙ හරි PC එක restart කරාට පස්සෙ හරි මේක නැති වෙලා යනව. ඒකට කරන්න තියෙන්නෙ Application -> System tools -> Preferences -> Startup Applications කියන එක select කරල පහල රූපෙ තියෙන විදියට ඒක සම්පූර්ණ කරල computer එක restart කරල බලන එක විතරයි.


Name : Conky
Command : sh -c "sleep 30s; conky -c ~/.conkyrc"
අන්තිමට කියන්නෙ තියෙන්නෙ graphical system monitor එකේ ඔයාගෙ dongle එකේ transmit/recieve rates බලාගන්න ඕනෙ නම් කරන්න තියෙන්නෙ .conkyrc file එකේ eth0 කියන තැන් ppp0 කියල වෙනස් කරගන්න එක විතරයි.

References
http://www.unixmen.com/configure-conky-lua-in-ubuntu-11-10-12-04-fedora-debian-and-linuxmint-howto-conky/

ලිනක්ස් වල HSDPA dongle එකකින් Internet Connect වෙමු

හුගක් අයට තියෙන ලොකු ප්‍රශ්නයක්. හැබැයි උත්තරේ නම් සරලයි. වින්ඩෝස් වල වගේ අපි පාවිච්චි කරන ඩොන්ගල් වල drivers install කරන්න දෙයක් නැහැ ඒ නිසා කට්ටියට හරි ලේසියි. මම පාවිච්චි කරපු හැම Huawei dongle එකකම වගේ drivers Ubuntu වල තිබුන. හරි Internet Connect වෙන්න කරන්න තියෙන්නෙ පොඩි දෙයයි. ඒ ටික පහල දාල තියෙන Screenshots ටික බලල කරන්න. මේ ක්‍රමයෙදි ඔයාගෙ ISPගෙ APN එක දැනගෙන ඉන්න වෙනව. ඒ අයගෙ customer service එකට call එකක් දුන්න නම් ඔයාට APN එක මොකක්ද කියල නිකම්ම දැන ගන්න පුළුවන්. මම පාවිච්චි කරන Etisalat වල APN එක වෙන්නෙ "etisalat.data".


How to Install Lost Ubuntu Bootloader Using Boot-Repair

ලිනක්ස් පාවිච්චි කරන හුගක් අයට තියෙන ප්‍රශ්නයක් තමයි ඒ අයගෙ machine එකට අළුතෙන් Windows දැම්ම‍ට පස්සෙ bootloader එක නැති වෙලා යන එක. ඔයා පාවිච්චි කරන්නෙ Ubuntu නම්, නැතිවෙලා ගිය bootloader එක ආයෙමත් install කරන්න පුළුවන්. හැබැයි ඒකට Ubuntu Live CD එකකුයි Internet එකයි අවශ්‍යයි. හරි දැන් අපි bootloader එක install කර ගන්නෙ කොහොමද කියල බලමු.

- මුලින් ම ඔයාගෙ computer එක Ubuntu live-CD එක දාල boot කර ගන්න.
- "Try Ubuntu" මත Enter කරන්න.
- Internet connect වෙන්න.
- Terminal එක open කර ගෙන පහත commands type කරන්න.

sudo add-apt-repository ppa:yannubuntu/boot-repair && sudo apt-get update 
sudo apt-get install -y boot-repair && boot-repair 

හරි ඊලගට තියෙන්නෙ අපි Install කරපු Boot-Repair program එක open කර ගන්න එක. ඒ සදහා terminal එක open කරල පහත command එක type කරන්න.
boot-repair 

හරි එතකොට ඔයාට ඔය උඩ තියෙන විදියට program එක open වේවි. ඊලගට කරන්න තියෙන්නෙ ඔය "Recommended repair" කියන button එක ඔබන එක විතරයි. ඊලගට repair එක ඉවර උනාට පස්සෙ paste.ubuntu.com/XXXXX විදියට එන URL ලියා ගන්න. ඊලගට computer එක restart කරන්න. මේ ටික කරලත් ඔයාලගෙ වැඩේ හරි ගියෙ නැත්නම් අර කලින් ලියාගත්ත URL එක forum එකකට දාල බලන්න.

References
https://help.ubuntu.com/community/Boot-Repair

Windows default වෙන විදියට Ubuntu bootloader එක හදන්නෙ කොහොමද?

මේ සදහා ක්‍රම දෙකක් තියෙනව. ඒ ක්‍රම දෙකටම grub file එක වෙනස් කළ යුතුයි. ඒ ක්‍රම දෙක තමයි

  • shut down කරන්න කලින් පාවිච්චි කරපු OS එක boot වෙන්න දෙන එක හෙවත් "saved" method එක.
  • හැම වෙලාවෙම එක OS එකක් default විදියට තැබීම.

මුලින්ම අපි සොයා ගන්න ඕනෙ මොන OS ද අපේ bootloader එකේ තියෙන්නෙ කියල. ඒ සදහා terminal එක open කරගෙන පහත command එක type කරන්න.

grep menuentry /boot/grub/grub.cfg


ඉතින් ඔයාගෙ computer එකේ OS ගොඩක් තියෙනවනම් කරන්න තියෙන්නෙ "saved method" එක යොදා ගන්න එක. මම වගේ :)

හොදයි මුලින්ම "saved method" එක ගැන කතා කරමු. grub boot configuration file එක open කරගන්න පහත command එක terminal එකේ type කරන්න. අවශ්‍ය උනොත් password එකත් දෙන්න.

sudo gedit /etc/default/grub

එහිදි ඒ file එක gedit එකෙ හරහා open වේවි. ඊට පස්සෙ කරන්න තියෙන්නෙ හරි පොඩි දෙයයි. ඔයා පාවිච්චි කරන්න කැමති "saved method" එක නම් ඒ file එකේ තියෙ GRUB_DEFAULT කියන තැන සමාන ලකුන ඉස්සරහින් saved කියල type කරන්න.

GRUB_DEFAULT=saved

ඊට පස්සෙ පහත line එකත් ඇතුලත් කරන්න.

GRUB_SAVEDEFAULT=true

ඔය ඉහලින් විස්තර කරේ "saved method" යොදා ගන්න විදිය. ඔයාට ඔනෙ හැම වෙලාවෙම එකම OS එකක් default විදියට තියා ගන්න නම් කරන්න තියෙන්නෙ මම අර මුලින්ම අරගත්තු grep ... output එකේ තිබුන OS එකක නමක් copy කරගෙන ඒ නම් GRUB_DEFAULT එකට දෙන එක විතරයි. හැබැයි ඒ නම "" ලකුනු අතර type කළ යුතුයි.

GRUB_DEFAULT="Windows NT/2000/XP (loader) (on /dev/sda1)"


වැදගත්ම අන්තිම පියවර

ඔයා grub configuration file එක වෙනස් කරාට පස්සෙ ඒක save කරල gedit editor එක close කරන්න. ඊට පස්සෙ terminal එක open කරගෙන පහත command එක දෙන්න. password එක ඇහුවොත් ඒකත් දෙනන.

sudo update-grub

හරි දැන් වැඩේ හරි ඔයා computer එක restart කරල බලන්න.

references

http://askubuntu.com/questions/52963/how-do-i-set-windows-to-boot-as-the-default-in-the-boot-loader

How to Install and Configure DNS


My sincere gratitude goes to Mr. Anuradha Jayakody and Mr. Rajitha Tennekoon of Sri Lanka Institute of Information Technology for teaching me these valuable concepts. Most of the below configurations are taken from the lab sheets written by them.

Prerequisites

Centos 5.5 installed in VMWare.
Stop the LDAP service. Stop DHCP service.
Set VMware network settings to NAT and set your server IP settings to obtain IP address automatically.
Restart the network service on CentOS.

Installation and configuration steps

Installing the Pre-Requirements

Install VM-Ware tools Go-to Applications -> Add/Remove Software
Under "Servers" Check (Tick) DNS Name Server
Then Select "Network Servers" -> click "Optional packages" -> make sure to select 12:dhcp-3.05.....el5.x86_64
Close it and select "Server Configuration Tools" click on "Optional packages" and make sure to check the following
system-config-bind-4.0 ..... el5.centos.noarch -> Nice GUI interface to manage your DNS server and records
Then install the selected packages

Installing the Dependencies 

Open a new terminal and install DNS & following dependencies
yum install -y bind-libs bind bind-utils bind-chroot 

Downloading the necessary packages 

Download the Webmin.rpm package from the following URL.
http://sourceforge.net/projects/webadmin/files/webmin/1.560/webmin-1.560-1.noarch.rpm/download 
Install Webmin via Webmin.rpm package. Webmin is a Free magnificent web based administrative tool for Linux environment.

Restoring the Network 

Set VMware network settings to VMNET2 and set your server IP address statically.
Start the LDAP service.
Start DHCP service.
Restart the network service

Configuring & Setting up the DNS 

Setting up the Environment 

Go to "System" -> "Server Settings" -> "Domain Name System"
Click ok for the Warning Massage (No Bind configuration was found)
Delete the existing components without the DNS Security Key [rndc key] and DNS server entry
You will be not able to delete the "Internet forward zone [.]" due to administrative restrictions. So you can delete it via the WebMin tool.
File -> Save Click Yes
If it does not load...........
open your web browser
go to "https://localhost:10000/"
Add an exception for the certificate issue and proceed
login using your root credentials
Go to "Servers" -> "BIND DNS Server"
Delete all the existing DNS Zones there
Now try to open your "BIND configuration GUI" via "System" -> "Server Settings" -> "Domain Name System"
Now you should be able to load the GUI
You should only see the rndc key and the DNS Server entry now.
Verify that all the entries are gone.

Adding “IPV4 Reverse” Zone 

Right click on "DNS Server" -> "Add" -> "Zone"
Now we are going to add our first zone.
We are going to add "IN Internet" Zone. So click the "OK" Button under the "IN Internet" drop-down menu.
Change the Origin Type to "IPV4 Reverse" -> click "OK"
Click on the "+ Add" Button twice.
Then Fill in your IP Address scheme in there. 10.0.1
Keep it as "Master" and click on "OK"
All the details in the next screen will depend on your network configuration and requirements. Ex. What is the refresh levels and the Expiration times.
We will keep the default settings and only we are considering is the "Zone File Path".
Change the "Zone File Path" into; 1.0.10.in-addr.arpa.zone -> Reverse of your IP Schema . Dirrection- Addr.arpa.zone
".zone" is a must and it is really important.
Then click "OK" and it will refresh the "BIND configuration GUI" and will not update anything.
After clicking "OK" then click "Cancel".
In "BIND configuration GUI" Goto File -> click "Save" -> Select "Yes"
Close it and Open it again so it will refresh and you will be able to see the zone that you added previously.
Now configure your Forward zone.
Right click on "DNS Server" -> "Add" -> "Zone"
We are going to add "IN Internet Forward" Zone. So click the "OK" Button under the "IN Internet" dropdown menu.
Change the Origin Type to "Forward" -> click "OK"
Give a name to the Forward zone "matara.sliit.lk."
Make sure to put a "." at the end of the name.
Here also change only the name of the "Zone File Path" as "matara.sliit.lk.zone"
Click "OK" and the Save the config as previously.

RNDC Entry

A Security key that uses to pass information securely between the DNS and DHCP server. Whenever you feel that the key is been compromised, Double click on the rndckey entry and click on the new button to generate a new key. 

Editing the configuration file 

Go to webmin and verify whether the created two entries(zones) are mapped or not.
Now it is the time to configure the configuration file on DNS server and make the DNS service run.
Click on the "Edit config File" in the webmin GUI.
Paste the following function after the first four comment lines
controls{
         inet 10.0.1.2 allow { localhost; } keys { rndckey; };
}; 
Find the following function on the configuration file.
zone "matara.sliit.lk." IN {
      type master;
      file "matara.sliit.lk.zone";
}; 
Edit it as follow.
zone "matara.sliit.lk." IN {
      type master;
      file "slaves/matara.sliit.lk.zone";
      allow-update {
            key rndckey;
      };
}; 
Then find the following function
zone "1.0.10.in-addr.arpa." IN {
      type master;
      file "1.0.10.in-addr.arpa.zone";
}; 
Edit it as follow.
zone "1.0.10.in-addr.arpa." IN {
      type master;
      file "slaves/1.0.10.in-addr.arpa.zone";
      allow-update {
             key rndckey;
      };
}; 
Observe the changes in the above functions that you have made and search and understand why you need to do such changes.
Click on the "SAVE" button to save the changes to the config file.

Editing the “resolv.conf” file 

In a terminal edit the resolv.conf file which resides on the etc folder.
gedit /etc/resolv.conf 
Give your search domain and your nameserver IP in the config file.
search matara.sliit.lk
nameserver 10.0.1.2 //your server ip
Save the file.
Find out the usage of “resolv.conf” file and about why we have insert the above two entries.

Making the Slave Zone copies 

Browse the folder "/var/named/chroot/var/named" and then delete all the unnecessary zones there if they exist.

DO NOT DELETE THE TWO ZONES THAT YOU HAVE CREATED BEFORE. 

Copy the two zone files that you have created inside this folder to the "slaves" folder which resides at the same directory.
So you will be having working copies at "/var/named/chroot/var/named" and the slave copies at "/var/named/chroot/var/named/slaves"
If something goes wrong, you will be able to back-up the zones using the original zones.

Setting permissions to those files 

Open up a terminal and move in to the slaves directory
cd /var/named/chroot/var/named/slaves 
Check the permissions of the files and folders on that directory.
Now give the write permissions to the group for the files inside the directory.
chgrp named *
chmod g+w * 
Addressing Forward and Transfer zones 

Go back to webmin.
Go to Servers -> BIND DNS Server -> click on "Forwarding and Transfers"
What is a Forward zone?
It will get you out through the Internet
If you don't have an IP Address of a valid Name Server (Provided by ISP) to route through the internet, give your router interface IP.
Type it under the IP address of "Servers to forward queries to"
Then Click on "Save" button.
Why are you giving your router interface address if you haven’t got a valid Name server?

Starting the DNS server 

Before starting the BIND server, make sure to check the “BIND.conf” file.
You can do this via the "Check BIND Config" Item in the webmin GUI under Servers -> BIND DNS Server.
Or else you can use the terminal to check the config file.
named-checkconf 
If you come across any errors, it is the time to correct the syntaxes in BIND.conf file. Do the corrections until you succeed.
Before proceed let’s check what happen if we have any errors.
Insert any letter in a blank space in your configuration file using webmin.
Save the file and check the config file via the “Check BIND Config” option in webmin.
Then correct the error.
Click on the link "Start BIND" in the Upper right corner of the Webmin Interface to start the BIND service.
Or start the service via the terminal.
service named start

Checking and Verifying whether the DNS server is working

You can use the “nslookup” tool to check the DNS service.
Open a terminal type nslookup.
Then type the name you need to resolve.
Hint : type “matara.sliit.lk” and observe the output.
Then check the both name-to-IP and IP-to-name conversions are working properly or not.
Also use the “dig” and “host -l” tools to check whether the DNS is working properly.
dig matara.sliit.lk
dig 1.0.10.in-addr.arpa
host -l matara.sliit.lk
Observe the out puts from the tools and search about the usage of the tools.

How to Install and Configure DHCP Server


My sincere gratitude goes to Mr. Anuradha Jayakody and Mr. Rajitha Tennekoon of Sri Lanka Institute of Information Technology for teaching me these valuable concepts. Most of the below configurations are taken from the lab sheets written by them. 

Prerequisites

Centos 5.5 installed in VMWare.
Stop the LDAP service.
Set VMware network settings to NAT and make your server IP settings to obtain IP address automatically.
Restart the network service on CentOS.

Installation and configuration Steps

Type the following command and install DHCP.
yum install –y *dhcp*
After you install the DHCP service, change your network settings to VMNET2 and assign your server static IP address.

Warning: If you do not configure the network settings to VMNET2 this installation will mess-up and harm entire company network.

Check the server’s IP is configured to 10.0.1.2 ( Specially you have to make sure, your server has been configured to static IP address)

 What is the command you have used to check the IP settings?
ifconfig
Type following command to copy the sample DHCP file given by the installation. Importantly, you have to remember that, this is the file we are going to configure as the DHCP server. Any misconfiguration of this file will effect to the smooth functionality of the DHCP server.
cp -f /usr/share/doc/dhcp*/dhcpd.conf.sample /etc/dhcpd.conf
If it asks to over write the file, over write it. Understand and write down what is the backup file here? And what is the configuration file we will be using here?
Back up file - dhcpd.conf.sample Configuration file - dhcpd.conf
Type following command to edit the dhcpd.conf file
gedit /etc/dhcpd.conf
If you don’t have following 3 lines in your DHCPD.conf file add them. And google for them and find what are meanings of those lines.

ddns-update-style interim;
#ignore client-updates;
allow client-updates; 


DYNAMIC DNS UPDATES

The DHCP server has the ability to dynamically update the Domain Name System.Within the configuration files, you can define how you want the Domain Name System to be updated. These updates are RFC 2136 compliant so any DNS server supporting RFC 2136 should be able to accept updates from the DHCP server.

Two DNS update schemes are currently implemented, and another is planned. The two that are currently available are the ad-hoc DNS update mode and the interim DHCP-DNS interaction draft updatemode. If and when the DHCP-DNS interaction draft and the DHCID draft make it through the IETF standards process, there will be a third mode, which will be the standard DNS update method. The DHCPserver must be configured to use one of the two currently-supported methods, or not to do dns updates. This can be done with the ddns-update-style configuration parameter.

THE INTERIM DNS UPDATE SCHEME

The interim DNS update scheme operates mostly according to several drafts that are being considered by the IETF and are expected to become standards, but are not yet standards, and may not be standardized exactly as currently proposed.

These are:
draft-ietf-dhc-ddns-resolution-??.txt
draft-ietf-dhc-fqdn-option-??.txt
draft-ietf-dnsext-dhcid-rr-??.txt

Because our implementation is slightly different than the standard, we will briefly document the operation of this update style here.

The first point to understand about this style of DNS update is that unlike the ad-hoc style, the DHCP server does not necessarily always update both the A and the PTR records. The FQDN option includes a flag which, when sent by the client, indicates that the client wishes to update its own A record. In that case, the server can be configured either to honor the client's intentions or ignore them. This is done with the statement allow client-updates;or the statement ignore client updates; By default, client updates are allowed.  

ddns-update-style interim : Now we have our information, so let's configure the server by creating a text file named /etc/dhcpd.conf. The first line in the file must be the DNS update scheme. There are 2 choices, but only one that works reliably ... so we will use that one.That is ddns-update-style interim  

ignore client-updates : allow the DHCP to update client info to a Dynamic DNS server. In our example, we are not going to try and update a Dynamic DNS via our DHCP server, so we will not allow client updates.

Dynamic DNS service

Dynamic DNS is provided by companies to allow users with Dynamic IP addresses to obtain a Domain Name that will always by linked to their changing IP address. The IP address is updated by either client software running on a computer or by a router that supports Dynamic DNS, whenever the IP address changes.

Carefully change following areas and understand each and every line and make a note that why exactly those lines are?

subnet 10.0.1.0 netmask 255.255.255.0 {
# --- default gateway
option routers 10.0.1.1;
option subnet-mask 255.255.255.0;
option nis-domain "blogspot.com"; 
option domain-name "blogspot.com"; 
option domain-name-servers
option time-offset -18000; # Eastern Standard Time 
allow booting; 
allow bootp; 
range dynamic-bootp 10.0.1.6 10.0.1.254;
default-lease-time 21600 max-lease-time 43200; 

Then comment the function named as 

host ns { ......
}

What is BootP? 

BOOTP, short for Bootstrap Protocol, is a protocol used to allow an Ethernet network device to obtain an IP Address over the network. 

A device that wants to obtain an IP address broadcasts a BootP request that identifies the device by its MAC address, an identifying six octet number ( ex: 00:A0:45:08:CD:8D) that is uniquely assigned to a device by its manufacturer. A BootP server on the network, sees the request and sends a BootP reply containing a desired IP address (ex: 192.168.1.10) to the device, thereby making it now become accessible to higher level network communications using that IP address. 

Save the file. 

Edit the following file and give the IP address that client need to contact and the Ethernet interfaceclients need to contact to obtain IP address from the server.

gedit /etc/sysconfig/dhcrelay 

INTERFACES="eth0" 
DHCPSERVERS="10.0.1.1" 

dhcrelay agent 

DESCRIPTION 

The Internet Systems Consortium DHCP Relay Agent, dhcrelay, provides a means for relaying DHCP and BOOTP requests from a subnet to which no DHCP server is directly connected to one or more DHCP servers on other subnets. 

OPERATION 

The DHCP Relay Agent listens for DHCP and BOOTP queries and responses. When a query is received from a client, dhcrelay forwards it to the list of DHCP servers specified on the command line. When a reply is received from a server, it is broadcast or unicast (according to the relay agent’s ability or the client’s request) on the network from which the original request came. 

Save the file and restart the DHCP service using 

service dhcpd restart 

Configure your client centos machines to obtain IP address form the DHPC service and verify that client has obtained an IP address from the given range of the IP addresses.

References

http://www.daemon-systems.org/man/dhcpd.conf.5.html 
http://wiki.answers.com/Q/What_is_the_BOOTP_protocol_used_for_where_might_you_find_it_in_Windows_network 

හන්තාන ලිනක්ස් 15 නිකුත් වේ!


නොකඩවා පස්වන නිකුතුවත් නිකුත් කිරීමට අප හට හැකියාව ඇත්තේ අප හා බැදුණු ශක්තිමත් ප්‍රජාව බව නොරහසකි. හන්තාන 14 (ගගන) නිකුතුව මේ වන විට මෙරට පාසැල් 15කට අධික සංඛ්‍යාවක (පරිගණක 500කට වැඩි) භාවිත වන අතර ඉන් එක් පාසැලක් ප්‍රාථමික පාසැලක් වීමද සුවිශේෂී වේ. එමෙන්ම රුවන්පුර විද්‍යාපිඨයේ පරිගණක 80කින් යුත් පරිගණක විද්‍යාගාරයෙදි හන්තාන ලිනක්ස් භාවිතය සඳහා පහසුකම් මේ වන විට සලසා ඇත.
තවද හන්තාන පරිශීලක ප්‍රජාව සඳහා වූ ෆෝරමයද ඉතා සක්‍රීය ව ක්‍රියාත්මක වේ. එමෙන්ම පසු ගියදා නිකුත් කළ හන්තාන ප්‍රජා සඟරාව ද ප්‍රජාව වෙත තොරතුරු සහ දැණුම ගෙනයාමෙදි තවත් විශේෂ කාර්යයක් සිදු කරයි. තවද 2011 වසර තුළදි හන්තාන 14 නිකුතුව අඩංගු DVD තැටි 2000කට වඩා වැඩි ප්‍රමාණයක් ලංකාව පුරා බෙදි ගොස් ඇති අතර ප්‍රායෝගික පුහුණු වැඩසටහන් සහ දේශණ වැඩසටහන් සඳහා එක් වූ පිරිස 1000කට වඩා වැඩි වේ. එමෙන්ම ජාතික අධ්‍යාපන ආයතනයේ විවිධ දෙපාර්තුමෙන්තු තුළ පරිගණක 25 කට ආසන්න සංඛ්‍යාවක ස්ථාපිත කළ අතර කණ්ඩායම් 5කට මේ වන විට ප්‍රායෝගික පුහුණු වැඩසටහන් නිමකර ඇත. තවද ශ්‍රී ලංකා නාවික හමුදා මූලස්ථානයේදි තොරතුරු තාක්‍ෂණ අංශයේ සේවයේ නියැලෙන විවිධ නිළයන් වලට අයත් 35 දෙනෙක් තෙදින පුහුණු වැඩසටහනට එක් වුයේ හන්තාන ලිනක්ස් පදනම් කරගෙන සාමාන්‍ය කටයුතු සහ මෘදුකාංග සංවර්ධණ කටයුතු ඉදිරියට පවත්වාගෙන යාමට අවශ්‍ය දැනුම ලබා ගැනීමටයි.

පරණ Ubuntu Install කිරීම නවතමු.

අප සෑම විටම උබන්ටු ස්ථාපනය කරන්නේ අන්තර්ජාලයෙන් ලබාගත් iso එකක් මගිනි. නමුත් සෑම විටම එසේ ලැබෙන්නේ අළුත්ම update සහිත Ubuntu නොවේ.

නමුදු ඔබට වේගවත් අන්තර්ජාල සබදතාවක් ඇත්නම "Installation Minimal CD" මගින් ඔබ පරිගණකයට උබන්ටු ස්ථාපනය කරගන්නා විටම නවතම updates ටික ලබාගන්නට පුළුවන්. තවත් වාසියක් නම් එකම Installation Minimal CD එක යොදාගෙන විවිධ වූ උබන්ටු සංස්කරන පරිගණකයේ ස්ථාපනය කරගත හැකි වීමයි.

ඉතින් Ubuntu Minimal CD එක download කර ගන්න මේ සම්බන්දකය හරහා යන්න. එම iso එක 20MB තරම් කුඩා අගයක් ගනියි.

youtube වීඩියෝ download කිරීමට youtube-dl

ලිනක්ස් මෙහෙයුම් පද්ධති භාවිතා කරන බොහෝ දෙනෙකුගේ ප්‍රියතම youtube වීඩියෝ ඩවුන්ලෝඩරය වන්නේ youtube-dl ය. ඉතින් නොදන්න අය ඉන්නවනම් එය ඔබේ ලිනක්ස් පරිගණකයේ ස්ථාපනය කරගන්නා හැටි මෙම ලිපියෙන් කියන්නම්.

youtube-ld යනු ලිනක්ස් shell එක හරහා වැඩ කරන python script එකක්. මෙම youtube-dl ඔබේ පරිගණකයේ ස්ථාපනය කර ගැනීමට

yum install youtube-dl (hanthana/fedora ඇතිවිට)
sudo apt-get install youtube-dl (ubuntu ඇතිවිට) 

යන commands දෙකෙන් එකක් යොදා ගන්න. මෙසේ youtube-dl ස්ථාපනය කර ගත් පසු ඔබට අවශය වීඩියෝව download කිරීමට shell එක තුළ

youtube-dl -o <ඔබේ/වීඩියෝවට/ලබාදෙන/නම.flv>  <youtube URL>

ලෙස ලබා දෙන්න. උදාහරණයක් ලෙස දුෂාන්ගෙ "ඔබ ඉන්නෙ කොහෙද කියා" වීඩියෝව download කරමු. ඒ සදහා shell එකේ

youtube-dl -o ObaInnekohedaKiya.flv http://www.youtube.com/watch?v=wGh8OYeQWUc youtube-dl 

යොදා ගන්න. 


youtube-dl latest python script එක ලබා ගැනීමට මෙම සම්බන්ධකය හරහා යන්න. මෙම script එක shell එකේ

python youtube-dl -o ObaInnekohedaKiya.flv http://www.youtube.com/watch?v=wGh8OYeQWUc 

ලෙස යොදා ගෙන run කරන්නට පුළුවන්.

How To Install Contiki & Cooja Simulator

මුලින්ම මම UCSC එකේ අසංකට ස්තූතිවන්ත වෙනව මට මේක කියල දුන්නට. පළමුවෙන්ම කියන්න ඕනෙ මම Contiki ස්ථාපනය කළේ Ubuntu 11.04 වල ඉදගෙනයි. කෙලින්ම වැඩේට බැස්සොතින් පියවර වෂයෙන්

1. මුලින්ම මම Applications->Accessories හරහා ගිහිල්ල Terminal එක ඇරගත්ත.

2. මම පාවිච්චි කරන්න බලාපොරොත්තුවෙන්නෙ කොන්ටිකි වල CVS version එක නිසා ඊලගට CVS install කරගත්ත පහත command එකෙන්

sudo apt-get install cvs

3.ඊලගට මම කොන්‍ටිකි source code එක download කරගත්ත පහත command එකෙන්

cvs -z3 -d:pserver:anonymous@contiki.cvs.sourceforge.net:/cvsroot/contiki co contiki-2.x

4.දැන් මම download කරපු folder එකේ පොඩි සාම්පල් කෝඩ් ටිකක් තියෙනව. ඒකෙ තියෙන hello-world කියන සාම්පල් එක compile කරගන්න මම පහත කෝඩ් එක ලිව්වා

cd contiki-2.x.x/examples/hello-world
make TARGET=native

5. ඊට පස්සෙ ඒ compile කරපු එක පහත command එක දීල run කරා

./hello-world.native

6. ඊට පස්සෙ මම ඒ compile කරපු කෝඩ් එකට අදාලව හැදිච්ච temporary files තියෙනවනම් ඒව අයින් කරන්න පහත command එක දුන්න.

make clean

7. හරි දැන් Contiki වැඩ.

8. ඊලගට මට Contiki operating system එක run වෙන network devices simulate කරන්න හදල තියෙන cooja කියන application එක install කරගත්ත.

9. Cooja දුවන්නෙ java jre එක උඩ නිසා මට java download කරගන්න උනා. ඒ සදහා පහත පියවර සිදු කරා

sudo add-apt-repository "deb http://archive.canonical.com/ lucid partner"
sudo apt-get update
sudo apt-get install sun-java6-jdk

10.cooja compile කරගන්න මට ant කියන tool එක download කරන්න උනා. පහත command එකෙන්

sudo apt-get install ant

11. හරි ඊලගට මට cooja compile cooja folder එකට ගියා

cd tools/cooja
ant run

12. හරි දැන් cooja වැඩ කරන්න පටන් ගන්න ඕනෙ. ඒක close කරාට පස්සෙ එය compile වෙනකොට හැදිච්ච temporary files අයින් කරන්න

ant clean දුන්න.

13. කොහොම හරි cooja එකේ මම අර කලින් run කරපු hello world example එකත් run කරන්න පුළුවන්. ඒත් ඒකට තව දේවල් ටිකක් install කරන්න වෙන නිසා ඒක කරන එක නවත්තල දැම්ම. දැන් ඔය අයට Ubuntu වල contiki install කරන හැටි පුළුවන්‍ වෙන්න ඕනෙ.

ලිනක්ස් වලදි partition table එක බලාගන්නෙ කොහොමද?

මුලින්ම Applications->System Tools හරහා ගොස් terminal එක විවෘත්ත කරගන්න. ඊට පස්සෙ su හෝ sudo ලෙස ලියා root ලෙස login වෙන්න. පහත පරිදි type කරන්න

parted /dev/sda print

එවිට ඔබේ පරිගණකයේ ඇති partition table එක පහත පරිදි පෙන්වාවි.

Model: ATA TOSHIBA MK2018GA (scsi)
Disk /dev/sda: 20.0GB
Sector size (logical/physical): 512B/512B
Partition Table: msdos

Number Start End Size Type File system Flags
1 32.3kB 8390MB 8390MB primary ntfs boot
2 8390MB 14.8GB 6440MB primary ext3
3 14.8GB 15.9GB 1078MB primary linux-swap
4 15.9GB 20.0GB 4088MB extended lba
5 15.9GB 20.0GB 4088MB logical ntfs

මීට අමතරව පහත සදහන් විධානයෙන්ද ඔබට parttion table එක බලා ගන්න පුළුවන් හැබැයි ටිකක් තේරුම් ගන්න අපහසුයි. මෙම විධානය ලබා දීමට root වීම අවශ්‍ය නොවේ

fdisk -l

එවිට out-put එක මෙලෙස පෙනේවි.

Disk /dev/sda: 20.0 GB, 20003880960 bytes
255 heads, 63 sectors/track, 2432 cylinders
Units = cylinders of 16065 * 512 = 8225280 bytes
Disk identifier: 0xc273c273

Device Boot Start End Blocks Id System
/dev/sda1 * 1 1020 8193118+ 7 HPFS/NTFS
/dev/sda2 1021 1803 6289447+ 83 Linux
/dev/sda3 1804 1934 1052257+ 82 Linux swap / Solaris
/dev/sda4 1935 2431 3992152+ f W95 Ext'd (LBA)
/dev/sda5 1935 2431 3992121 7 HPFS/NTFS

ලිනක්ස් install කලාට පස්සෙ windows default OS එක විදියට තියාගන්නෙ ‍කොහොමද?


බොහෝ දෙනෙකුට තියෙන ගැටළුවක්. නමුත් පිළිතුර නම් හරිම සරලයි. ඔබේ gnome desktop එකේ System->Administration->Bootloader තෝරන්න. ඊට පස්සේ එන වින්ඩෝවෙදි ඔබේ root password එක ලබා දෙන්න.


ඉන්පසුව ලැබෙන Boot Configuration කියන වින්ඩෝවෙ Please select the default boot entry for the system යටතේ එන other කියන එක තෝරල අවශ්‍ය නම් bootloader එක විවෘත්ත වෙලා තියෙන්න අවශ්‍ය කාලයත් සකස් කරල OK බොත්තම ඔබන්න.

හම්බන්තොට ශාන්ත මරියා විද්‍යාලයේදි හන්තාන දකින්න

හම්බන්තොට ශාන්ත මරියා විද්‍යාලයේදි හෙට සහ අනිද්දා (24 සහ 25) පැවැත්වීමට නියමිත තොරතුරු තාක්‍ෂණ ප්‍රදර්ශනයෙදි හන්තාන ලිනක්ස් භාවිත කිරීමට සහ නොමිලේම ලබා ගැනීමට හැකියාව ඇත.

ජුනි මස තුළදි ලංකාවේ නගර 10කදි වැඩසටහන් 10ක් ක්‍රියාත්මක වීමට නියමිතයි. ඒ සියල්ල පාසැල් සිසුන් සහ ගුරුවරුන්ට පමණක් සීමා වන අතර සහභාගි වීමට ඇරයුම් ලබන්නේ අදාල පාසැලේ හෝ පෙදෙසේ තොරතුරු තාක්‍ෂණ සිසුන් සහ ගුරුවරුන්ට පමණයි. 

ස්තුතියි,
--
Danishka Navin
http://danishkanavin.blogspot.com
http://twitter.com/danishkanavin
http://identi.ca/danishka

ලිනක්ස් වල හයිබනේට්

ඇත්තටම වින්ඩෝස්ව වලදී එන hibernate කතන්දරය ගැන ඔබ අසා ඇතුවාට කිසිම සැකයක් නැත. සාමාන්‍යයෙන් අප නම් බොහෝ දුරට hibernate භාවිතා කරන්නේ අප පරිගණකයට ඉක්මනින් login වී අපගේ වැඩ කටයුතු පහසු කර ගැනීමටය. විශේෂයෙන් තම පරිගණකය hibernate කිරීම මගින් එය shutdown කළ පසු ඉක්මනින්ම login වීමට අවස්ථාව සැලසේ. වින්ඩෝස් වලදී නම් hibernate පහසු කම සකස් කර ගැනීමට විශේෂයෙන් settings සකස් කළ යුතුයි. නමුත් ලිනක්ස් වලදී නම් එසේ අවශ්‍ය නැත. මෙය සිදු කර ගැනීමද හරිම පහසුය. ඔබ සාමාණ්‍යයෙන් gnome desktop එකෙන් තම පරිගණකය shutdown කරන්නේ system->shutdown හරහාය. මෙසේ shutdown මත click කළ විට ලැබෙන dialog box එකේ hibernate බොත්තම එබීමෙන් ඔබටත් ඔබේ ලිනක්ස් පද්ධතිය hibernate කර ගත හැකිය.


dual boot වීමට සකස් කරගෙන ඇති වින්ඩෝස් පරිගණකයේදී නම් hibernate පහසු කම ලබා ගැනීමට නොහැක. නමුත් ලිනක්ස් වලදී ඔබේ පරිගණකය dual boot වීමට සකස් කරගෙන තිබුනා වුවත් hibernate කිරීම තුලින් ප්‍රශ්නයක් ඇති නොවීම මෙහි ඇති වාසියකි.

ලිනක්ස් වල mysql server ස්තාපනය කර ගනිමු


mysql server යනු පරිගණකයක තොරතුරු පද්ධති (databases) ගබඩා කර තබා ගන්නා ස්ථානයක් යයි සරල පාඨකයාට අවධාරනය කරනනෙමු. ප්‍රධාන වශයෙන්ම relational databases තබා ගන්නා ස්ථානයක් ලෙස mysql server සැලකිය හැක. Relational database එකක් යනු සරලවම වගු ආකාරයට (rows සහ columns) තොරතුරු ගබඩා කර තබා ගන්නා ස්ථානයක් ලෙස මතක තබා ගන්න.

සර්වරයක් යනු කුමක්දැයි ඉගෙනීමට මේ සම්බන්ධකය හරහා යන්න.

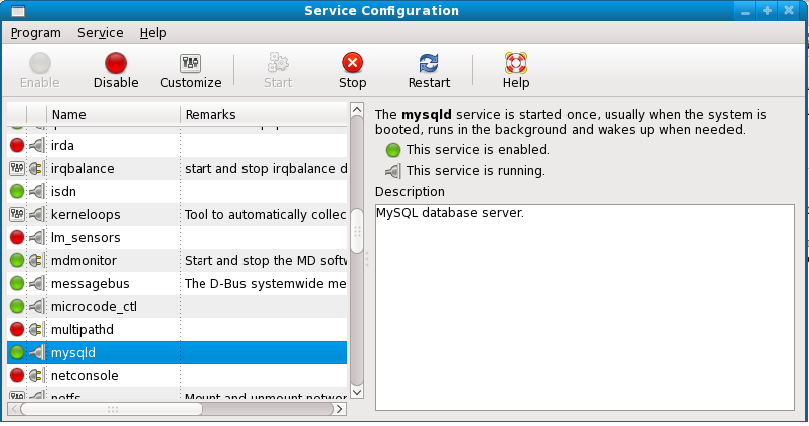
ප්‍රථමයෙන්ම කිව යුතුවන්නේ බොහෝමයක් ලිනක්ස් මාදිලි තුලදී mysql server එක එම මෙහෙයුම් පද්ධතිය ස්ථාපනය වන අවස්තාවේදීම පරිගණකයේ ස්තානගත වන බවයි. මෙසේ ඔබේ පරිගණකයේත් මෙම server එක ස්ථාපනය වී ඇත්දැයි බලාගැනීමට ඔබේ gnome desktop එකේ System->Administration->Services යන මාර්ගයේ ගොස් services configuration යන වින්ඩෝව විවෘත්ත කරගන්න.


ඉහත රූපයේ මෙන් එහි ඇති mysqld යන්න සොයා ගන්න. රූපයේ දිස්වෙන පරිදි කොල පාට රවුමෙන් කියවෙන්නේ mssql server එක ඔබේ පරිගණකයේ ක්‍රියාත්මකවේය යන්නයි. නමුත් බොහෝ වෙලාවට මෙම රවුම රතුපැහැ ගැන්වී තිබේ. එනම් එය ක්‍රියාත්මක නොවේ යන්නයි. මෙය ක්‍රියාත්මක කර ගැනීම ඉහත රූපයේ ඇති වින්ඩෝවේ තිබෙන start යන බොත්තම ඔබා කොල පාටින් දිස්වෙන Enable යන බොත්තම එබීමෙන් සිදු කර ගත් හැක. හරි දැන් ඔබේ ලිනක්ස් පරිගනකයේ mysql server වැඩ සටහන ක්‍රියාත්මක වේ.

ඉහත ආකාරයට ඔබේ පරිගණකයේ mysql server එක ස්ථාපනය වී නොමැති නම් system->administration->add/remove software හරහා ගොස් search වින්ඩෝවේ mysql යනුවෙන් type කර apply බොත්තම එබීම තුලින් ඔබට ඔබේ පරිගණකයේ mysql server වැඩසටහන ස්ථාපනය කරගත හැක.


නැත්නම් terminal එකේ root user වී (su ටයිප් කර ඔබේ root password එක ලබා දීම තුලින්) හන්තාන ලිනක්ස් හෝ fedora සංස්කරන වලදී නම්


ලෙසද උබුන්ටු වලදී නම්


ලෙසද ලබා දීම තුලින් සිදු කරගත හැක.

ඔබ msql server ස්ථාපනය කරගත් පසු ප්‍රථමයෙන්ම ඔබ විසින් සිදු කර ගත යුතු කාර්‍ය්‍යක් පවතී. එනම් mysql server එකට password එකක් ලබාදීමයි. මේ සදහා ඔබේ terminal එක විවෘත්ත කරගන්න. ඉන් පසු පහත විධානය ලබාදීම තුලින් ඔබට අවශ්‍ය අළුත් password එකක් ලබා දීම සිදු කළ හැක.


ඔබට අළුත් database එකක් සාදා ගැනීම සදහා විදානය ලබා දෙන්න.


Sql query ලිවීමට ඔබට අවශ්‍ය නම් ප්‍රථමයෙන් ඔබේ mysql server එකට login විය යුතුයි. ඒ සදහා පහත පරිදි type කරන්න.


ඉන් පසුව ලැබෙන mysql>prompt එකෙහි sql විධාන type කිරීම සිදු කළ හැක. වැදගත් කාරනයක් වන්නේ ඔබ ලබා දෙන විධාන සෑම එකක්ම semicolon ( ; ) එකකින් අවසන් විය යුතු වීමයි.
mysql> හි විධාන ලබාදීමට ප්‍රථමයෙන් එහි ඔබ සකස් කළ database එකක් එයට පෙන්වා දිය යුතුයි. ඒ සදහා


යනුවෙන් type කරන්න. ඉන්පසු ඔබට අවශ්‍ය query එකක් එහි type කර ගත හැක.

query ලිවීම හා mysql ගැන වැඩිදුර විස්තර කියවීමට MySQL on Linux Tutorial යන්න.

හන්තාන ලිනක්ස් පිළිබද ඇතුලත තොරතුරු නිර්මාපකයාගේ ඇසින්

හන්තාන ලිනක්ස් යනු ෆෙඩෝරා මෙහෙයුම් පද්ධතිය මත ගොඩ නැගූ සමීශ්‍රණ මෙහෙයුම් පද්ධතියකි.
එනම් මෙහිදි ෆෙඩෝරා රෙපොසිටරි  සහ වෙනත් බාහිර රෙපොසිටරි හරහා පැකේජ ලබා ගනි.

එලෙසින් අදාල නිකුතුව සඳහා අවශ්‍ය මූලික පැකේජ මෙන්ම යාවත් කිරීම්ද නිසි තත්ත්ව පරීක්‍ෂණයන් හරහා ඔබවෙත ලැබේ.

නිදහස් සහ විවෘත මෘදුකාංග වල කේතය ලබා ගත හැකි නිසා අවශ්‍ය කෙනෙක්ට එම කේතය හානිකර ලෙස සකසා යළි ඇසුරුම් කර (re-packaging)

අන්තර්ජාලයට මුදා හැරීමට අවකාශ ඇත. නමුත් ෆෙඩෝරා හරහා එන යාවත් කිරීම් එම ව්‍යාපෘතියේ තත්ත්ව පරීක්‍ෂණ ඉංජිනේරුවන් හරහා
ඔබට ලැබේ.

Red Hat හෝ Suse  වැනි පද්ධතියකට අදාල සමාගම් සමඟ සහායක ගිවිසුම් අත්සන් කර අවස්තාවක හැර, අනෙක් ඕනෑම අවස්තාවකදි
වෙනත් බාහිර පැකේජ ස්ථාපනයට ඔබට අවසර ඇත. ඒ ඔබේ නිදහසක්. නමුත් එවැනි කටයුත්තක් නිසා ඔබේ පද්ධතියේ ඇති වන ඕනෑම
අකර්මන්‍යතාවයක් සඳහා ඔබ අවදානම ලබා ගැනීමට සූදානම්ව එසෙ කළ යුතුයි.

එවැනි ක්‍රියාවකින් පසුව පද්ධතියේ සමහර මෘදුකාංග වල නිසි ක්‍රියාකාරිත්වයක් නොමැති වීම, පද්ධතියේ ආරක්‍ෂාව අවදානම් සහිත වීම, හෝ
වෙනත් හානියක් සිදු වුවහොත් පද්ධතිය මුලින්ම ස්තාපනය කළ පුද්ගලයාටවත් අදාල මෘදුකාංගවල නිර්මාපකයින්ටවත් දොස් පැවරිය නොහැක.

ඔබ හන්තාන ලිනක්ස් හෝ වෙනත් මෙහෙයුම් පද්ධතියක් සඳහා යාවත් කිරීම් ලබා ගන්නා විට ඒ සමඟ එන මෘදුකාංග එකිනෙක ගැලෙපීම් කර ඇත.

විශේෂයෙන්ම වෙළුම් අංක (version numbers). තෙවැනි පාර්ශවික යෙදුම් මඟින් පැරණි නිකුතුවන් සඳහා අදාල මොඩියුලයන් ලැබිය හැක.
ඔබ හන්තාන ලිනක්ස් 14 (14.1, 14.5, 15.6,.. ඔනම එකක්) භාවිත කරයි නම් ෆෙඩොරා 14 සඳහා අදාල උපදෙස් භාවිත කළ හැකියි.
උදා:  abc මෘදුකාංග හන්තාන 14.5 සඳහා ස්තාපනයට උපදෙස් අවශ්‍ය නම්.
 ගුගල් මත සෙවිමේදි Fedora 14 සහ  abc යන සෙවුම් වදන් භාවිත කරන්න.

තවද මෘදුකංගයක් ගැන විමසිමේදි හෝ අදහස් දැක්විමෙදි එම මෘදුකාංගයේ නිකුතුව කුමක්ද, මොන මෙහෙයුම් පද්ධතිය තුළද , වගේ තොරතුරු

දැන් වීමට කාරුණික වන්න.

හන්තාන මත දැනට නොමැති එනමුත් ඉදිරියේදි එක්විය යුතු යැයි හැගෙන මෘදුකාංග ඇත්නම් ඒබව දන්වන්න. අදාල මෘදුකාංගයේ නම, එම මෘදුකාංගයේ අවශ්‍ය තාවය,
අදාල මෘදුකාංගය නිමැවෙන ව්‍යාපෘතියේ වෙබ් අඩිවය වැනි තොරතුරු ලබා දෙන්න. එසේම එලෙස අත්‍යාවශ්‍ය මෘදුකාංගයක් හන්තාන මත ස්තාපනය කරන අයුරු මෙම සමූහයට දැන්වීම මඟින් අනෙක් අයටත් වැදගත් විය හැක.

ස්තුතියි,
--
Danishka Navin
http://danishkanavin.blogspot.com
http://twitter.com/danishkanavin
http://identi.ca/danishka

-- 
Subscribe to Hanthana User Group.
To post to this group, send email to hanthana-community@googlegroups.com
For more options, visit this group at
http://groups.google.com/group/hanthana-community?hl=en

~ Feel The Freedom ~
Web Site: http://www.hanthana.org
Blog : http://blog.hanthana.org
Identi.ca : http://identi.ca/hanthana
Twitter : http://twitter.com/hanthana

හන්තාන ලිනක්ස් පරිගණකයේ ස්තාපනය කරගන්නා අයුරු විඩියෝ දර්ශන මගින්

හන්තාන ඉංග්‍රීසි අතුරු මුහුනත ඇති විට පරිගණකයේ ස්ථාපනය කරන ආකාරය.


හන්තාන සිංහල අතුරු මුහුනත ඇති විට පරිගණකයේ ස්ථාපනය කරන ආකාරය.


මෙම වීඩියෝ දර්ශන නිර්මාණය කර සැමගේ ප්‍රයෝජනය සදහා youtube අඩවියට එකතු කළ මලින්ද ලක්නාත් සහෝදරයාට මගේ ස්තූතිය.

ලිනක්ස් වල අපට අවශ්‍ය මෘදුකාංගයක් කේතවල සිට compile කරගනිමු

මුලින්ම කියන්න තියෙන්නේ මෙම ක්‍රියාව සම්පුර්ණයෙන්ම සිදුකරගනු ලබන්නේ තමන්ගේ ලිනක්ස් සංස්කරනයේ ඇති terminal එක හරහායි. මුලින්ම ඔබට අවශ්‍ය මෘදුකාංගයක source code එක download කර ගත යුතුයි. මෙහිදී ඔබට අවශ්‍ය කරන මෘදුකාංගය සහිත වෙබ් අඩවියට ගොස් එහි ඇති download වැනි ස්ථානයකින් තමන්ගේ source code file එක මුලින්ම බාගතකරගන්න. ඉන්පසු භාගත කරගත් ස්ථානයට ගොස් එය tar.gz වැනි ආකරයට තිබේනම් (tar.gz යනු zip/rar වැනි ස්මපීඩිත ෆයිල් වර්ගයකි) එම ෆයිල් එක මත right click කර එය extract කර ගන්න. ඉන් පසු terminal එකෙන්, cd, command එක හරහා තමන් extract කර ගත් file එක තිබෙන ස්ථනයට යන්න. cd command එක ගැන ඉගෙනීමට මේ සම්බන්ධකය හරහා යන්න. මුලින්ම terminal එක වීවෘත්ත කරගෙන එහි su command එක මගින් ඔබේ root password එක ඇතුලත් කර root (වින්ඩෝස් වල administrator) වී පහත පියවර අනුගමනය කරන්න.

1. `cd' command එක යොදා ගනිමින් terminal එක හරහා ඔබ extract කර ගත් directory එක තුලට යන්න. cd command එක ගැන ඉගෙනීමට මේ සම්බන්ධකය හරහා යන්න.

2. `./configure` යනුවෙන් type කරන්න. මෙහිදී වැඩකටයුතු සිදුවී හමාර වීමට යම්කිසි කාලයක් ගතවේවි ඒ අතර තුර terminal එකේ සමහර පණිවිඩ දර්ෂනය වේවි.

3. දෙවෙනි පියවර සිදුවී අවසාන වූ පසුව terminal එකේ make යනුවෙන් සටහන් කරන්න. මෙම කමාන්ඩ් එක ලබා දීම තුලින් ඔබ භාගතකරගත් මෘදු කාංගය compile වීම ආරම්භවේ.

4.තුන්වන පියවර අවසන්වූ පසු make install විදානය ලබාදේන. මෙය මගින් ඔබේ පරිගණකයට ඔබ source code එකේ සිට compile කර ගත් program එක ස්ථාපනය කර දේවි.

1. `cd' to the directory containing the package's source code and type
`./configure' to configure the package for your system.
Running `configure' might take a while. While running, it prints
some messages telling which features it is checking for.

2.Type `make' to compile the package.

3. Optionally, type `make check' to run any self-tests that come with
the package.

4. Type `make install' to install the programs and any data files and
documentation.

5. You can remove the program binaries and object files from the
source code directory by typing `make clean'. To also remove the
files that `configure' created (so you can compile the package for
a different kind of computer), type `make distclean'. There is
also a `make maintainer-clean' target, but that is intended mainly
for the package's developers. If you use it, you may have to get
all sorts of other programs in order to regenerate files that came
with the distribution.

6. Often, you can also type `make uninstall' to remove the installed
files again.

මෙසේ මෘදුකාංගයක් source code එකේ සිට compile කිරීමෙන් සැලසෙන එක් වාසියක් වන්නේ ඔබට මෘදුකාංග ස්ථාපනය කර ගැනීමට අන්තර්ජාල සම්බන්ධතාවක් අවශ්‍ය නොවීමයි. ඔබට අවශ්‍ය මෘදුකාංගයෙහි code එක වෙනත් ස්ථානයකින් භාගතකරගෙනවිත් තමන්ගේ පරිගණකයේ සිට එය compile කර run කර ගත හැකිවීමයි.

Add to Google Reader or Homepage

Bloggers - Meet Millions of Bloggers

Add to My AOL Add to netvibes